Battery switch on travel trailer function is crucial for managing your RV’s power. Understanding how these switches work – whether single, dual, or rotary – is key to safely using your trailer’s electrical system. This guide covers everything from locating and operating your switch to troubleshooting issues and performing maintenance, ensuring you’re prepared for any situation on the road.
We’ll delve into the different types of switches, their advantages and disadvantages, and how they interact with other electrical components like your converter and solar panels. We’ll also explore optimal placement for easy access and weather protection, providing clear, step-by-step instructions and safety tips for operation and maintenance. Properly understanding your battery switch ensures a smooth and safe camping experience.
Battery Switch Types in Travel Trailers

Choosing the right battery switch for your travel trailer is crucial for managing your power sources efficiently and safely. Different types offer varying levels of control and complexity, each with its own set of advantages and disadvantages. Understanding these differences will help you select the best option for your needs.
Single Battery Switch Operation
A single battery switch is the simplest type, designed for trailers with only one battery. It’s a basic on/off switch that connects or disconnects the battery from the trailer’s electrical system.
| Type | Function | Advantages | Disadvantages |
|---|---|---|---|
| Single Battery Switch | Connects/disconnects a single battery to the trailer’s electrical system. | Simple, inexpensive, easy to install. | Limited functionality; only one battery can be used at a time. |
Dual Battery Switch Operation
Dual battery switches manage two batteries, typically a house battery and a starting battery. They allow for independent control of each battery, enabling you to isolate one while using the other, protecting against accidental drain.
So, you’re an audiophile who travels? Awesome! Check out this guide on setting up your audiophile travel setup for pristine sound on the go. It’s crucial to protect your investment, so don’t forget to get solid travel insurance. Consider looking into Aon travel insurance for comprehensive coverage; they often have options tailored to high-value possessions.
Planning ahead ensures you enjoy both amazing music and peace of mind during your adventures!
| Type | Function | Advantages | Disadvantages |
|---|---|---|---|
| Dual Battery Switch | Independently controls two batteries (e.g., house and starting). Often includes a combined position. | Independent control of each battery, prevents accidental drain, extends battery life. | Slightly more complex than a single switch; more expensive. |
Rotary Battery Switch Operation
Rotary switches, often found in more sophisticated setups, offer multiple positions for controlling one or more batteries. These switches provide granular control over power distribution, allowing for various combinations of battery usage. They are usually more robust than simple on/off switches.
| Type | Function | Advantages | Disadvantages |
|---|---|---|---|
| Rotary Battery Switch (e.g., 3-position) | Provides multiple positions to control one or more batteries, such as “Battery 1 only,” “Battery 2 only,” “Both Batteries,” and “Off.” | Versatile control over multiple batteries; better protection against accidental drain. | More complex installation; more expensive than simpler switches. |
Comparison of Battery Switch Types
The choice between single, dual, or rotary battery switches depends on your trailer’s setup and your power needs. Single switches are the most basic and affordable, suitable for trailers with a single battery. Dual switches are ideal for trailers with separate house and starting batteries, offering better control and protection. Rotary switches provide the most versatility but come with increased complexity and cost.
Consider the number of batteries in your RV and your desired level of control when making your decision.
Battery Switch Location and Accessibility
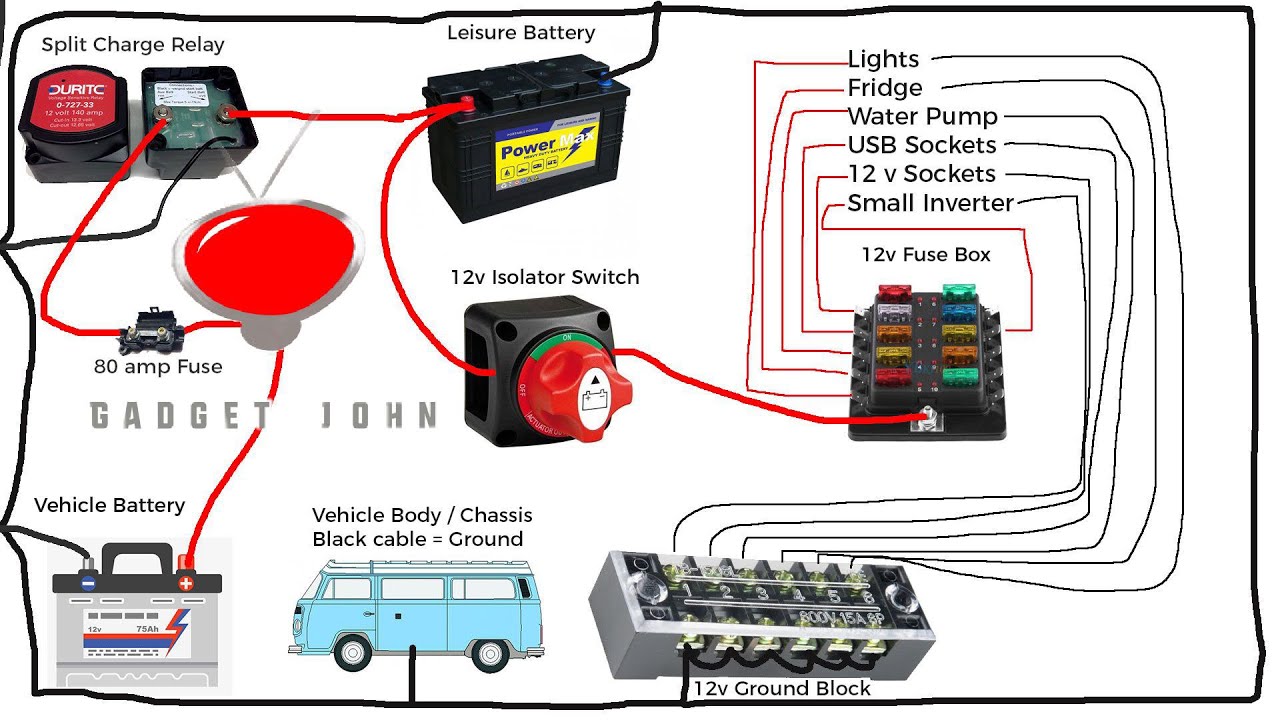
Finding your battery switch quickly is crucial, especially in emergencies or when performing routine maintenance. A poorly located switch can turn a simple task into a frustrating ordeal, potentially delaying necessary repairs or leaving you stranded. This section details ideal locations and emphasizes the importance of convenient access.The location of your battery switch varies greatly depending on the travel trailer’s make, model, and year.
Common locations include inside a dedicated compartment near the batteries themselves (often under a hinged access panel), within a lockable storage compartment, or even inside a small weatherproof box mounted on the trailer’s tongue. Some manufacturers might place it inside a roadside access panel, while others integrate it into the main control panel inside the trailer.
So, you’re an audiophile who travels? Awesome! Check out this guide on setting up your audiophile travel setup for amazing sound on the go. It’s crucial to protect your investment, though, so make sure you’ve got solid travel insurance. Getting Aon travel insurance is a smart move – peace of mind is priceless, especially when you’re carrying expensive gear!
Typical Battery Switch Locations
The optimal placement balances accessibility with protection from the elements. An outdoor location requires a weatherproof enclosure to prevent corrosion and damage from moisture. Inside the trailer, near the main electrical panel, is convenient but might lack sufficient ventilation. Placement near the batteries themselves minimizes wiring length but might require crawling under the trailer for access, which isn’t ideal.
Importance of Easy Access
Easy access to the battery switch is paramount for several reasons. In an emergency, such as a short circuit or fire, being able to quickly disconnect the battery is vital for safety. Routine maintenance, including battery testing and cleaning, is also significantly simplified with easy access. A poorly placed switch can prolong maintenance tasks and make troubleshooting electrical issues more challenging.
Optimal Battery Switch Placement Schematic
Imagine a schematic showing a travel trailer’s exterior. The ideal placement would be in a readily accessible, weatherproof enclosure on the exterior sidewall, near the battery compartment but slightly elevated to avoid ground water accumulation. This location offers easy access without requiring you to crawl under the trailer. The enclosure should be clearly labeled, robust, and secured with a locking mechanism.
Internal wiring should be neatly routed and protected from abrasion or accidental damage. The switch itself should be large and clearly marked, preferably with an indicator light showing the switch’s status. Consider a location on the tongue of the trailer as an alternative for larger travel trailers or those with limited sidewall space, provided it’s within easy reach and adequately protected from the elements.
A weatherproof box with a hinged door and clear labeling is essential regardless of the chosen location. Finally, ensure the chosen location doesn’t interfere with other equipment or hinder the trailer’s maneuverability.
Battery Switch Maintenance and Replacement
Keeping your travel trailer’s battery switch in good working order is crucial for reliable power. Neglecting maintenance can lead to corrosion, poor connections, and ultimately, a dead battery when you need it most. Regular inspection and occasional cleaning will significantly extend the lifespan of your switch and prevent unexpected breakdowns.Regular maintenance will ensure your battery switch functions correctly, preventing potential problems down the road.
This is especially important given the harsh conditions travel trailers often face, including exposure to moisture and vibration.
Battery Switch Maintenance Schedule
A simple maintenance schedule can prevent many problems. Aim for a visual inspection every three months, and a more thorough cleaning and inspection at least once a year, or more frequently if you’re in a particularly harsh environment (e.g., coastal areas with high salinity). More frequent inspections are recommended if you notice any unusual behavior, such as difficulty switching or flickering lights.
Cleaning and Inspecting the Battery Switch, Battery switch on travel trailer function
Before starting any work, always disconnect the battery’s negative terminal. This is a critical safety precaution to prevent accidental shorts and electrical shocks. Use a wire brush to clean any corrosion from the terminals and the switch itself. Pay close attention to the contact points – any buildup of corrosion can hinder conductivity. A baking soda paste (baking soda mixed with water to form a paste) can be applied to corroded areas, left for a few minutes, and then scrubbed off.
After cleaning, apply a corrosion inhibitor to the terminals and contact points to help prevent future corrosion. Finally, visually inspect the switch for any signs of damage, such as cracks or loose connections.
Replacing a Faulty Battery Switch
Replacing a battery switch is a relatively straightforward task, but it requires careful attention to safety. Before you begin, gather the necessary tools: a wrench (size will depend on your switch), a screwdriver (Phillips or flathead, depending on the switch), wire cutters/strippers, and a new battery switch (ensure it’s the correct amperage rating for your system). Remember to always disconnect the negative battery terminal first! Next, carefully remove any wires connected to the switch, noting their positions for accurate reconnection.
Use wire cutters/strippers to remove any corroded wire ends, and ensure the new wire ends are clean before connecting them to the new switch. Install the new switch securely, ensuring all connections are tight. Reconnect the wires, making sure they match the original configuration. Finally, reconnect the battery’s negative terminal and test the switch to ensure it functions correctly.
Mastering your travel trailer’s battery switch is essential for a trouble-free RV experience. By understanding its function, proper operation, and maintenance, you’ll be empowered to handle any electrical situation confidently. Remember to always prioritize safety and consult a professional if you encounter complex issues. Happy travels!
FAQ: Battery Switch On Travel Trailer Function
What happens if I leave my battery switch on all the time?
Leaving your battery switch on constantly can drain your batteries, especially if you’re not using the trailer. It’s best to turn it off when not in use to conserve power.
How do I know which battery switch is right for my travel trailer?
The best battery switch depends on your trailer’s setup and power needs. A single switch is simplest, while dual switches offer more control. Consult your trailer’s manual or a qualified RV technician for advice.
My battery switch is making a clicking noise. What’s wrong?
A clicking noise often indicates a faulty switch or a problem with your battery connections. Check for loose wires or corrosion before attempting repairs. If the problem persists, consult an electrician.
Can I replace my battery switch myself?
Replacing a battery switch is possible with some basic electrical knowledge and tools. However, if you’re uncomfortable working with electricity, it’s best to hire a qualified RV technician to avoid potential damage or injury.
